Contents:
1.Overview of the Application
1.1Product Description
Reindex is an application that will help you to reindex one or more existing indices, into the local or remote Elasticsearch cluster. The Application is essentially a dedicated UI which purpose is to ease reindexing your data to remote or local clusters without directly using Elasticsearch reindex API. This application works via a web browser, so you could use it on the local or remote machine For the reindex process, we use Reindex API, so all that we do - send to the Elasticsearch the REST commands, containing the source, destination and reindex parameters, depends on the reindex algorithm.
1.2Key Features
You can set up the number of concurrently processed indices, and the number of concurrent data frames per index (in case of Time oriented algorithm usage) Reindex support SSL with a certificate (you'll need to upload it), or without (we will set the SSL verification to "none"). Reindex doesn't save your passwords. In case of restarting the Application, you'll be required to insert them again. Application supports the following destinations:
- Merge multiple indices into one index
- Reindex to alias
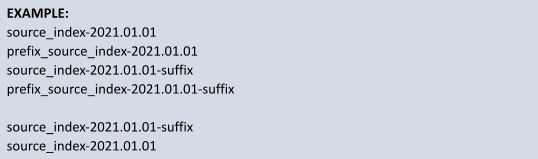
- Reindex to the index/indices named with prefix + original_index_name
- Reindex to the index/indices named with original_index_name + suffix
- Reindex to the index/indices named with original_index_name - suffix
- Reindex to ILM rollover alias with the possibility to create first ILM index (for example index-000001 for size rollover or %3CINDEX_NAME-%7Bnow%2Fd%7D-000001%3E for time series indices)
- Remote reindex with the same index name
1.3System Requirements
- Java 8+
- For remote reindex, you'll need to define the reindex.whitelist setting in your elasticsearch.yml file in each Elasticsearch node of the remote cluster, you'll require to define: reindex.remote.whitelist: "otherhost:9200, another:9200, 127.0.10.:9200, localhost:" (PAY ATTENTION! There is no http/https at start of the address)
- For remote reindex to cluster with https connection: In your elasticsearch.yml file in each Elasticsearch node of the remote cluster you'll require to define: reindex.remote.whitelist: "otherhost:9200, another:9200, 127.0.10.:9200, localhost:" (PAY ATTENTION! There is no http/https at start of the address) reindex.ssl.verification_mode: none (One of full, none, certificate) reindex.ssl.certificate: /etc/elasticsearch/certs/ca.crt (Path to root ca).
2Installation and Configuration
2.1Download
You can download the application from our release in the GitHub repository:
https://github.com/dbeast-co/Reindex/releases

2.2Installation
In order to install the Application, you need to download and unpack reidex.zip file on your machine.
For the Windows- 1.Edit file config/reindex.yml Specify the host and port host: HOST_OR_IP port: PORT
- 2.Run file reindex.bat
- 1.From the application home folder: chmod +x reindex.sh
- 2.Edit file config/reindex.yml Specify the host and port host: HOST_OR_IP port: PORT
- 3../reindex.sh
3.Application Usage
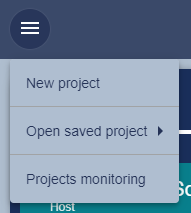
Main drop-down menu at the top left corner leads to 3 pages: “New project”, “Open saved project”, “Projects monitoring”.
At the first run, the page will appear with empty fields:

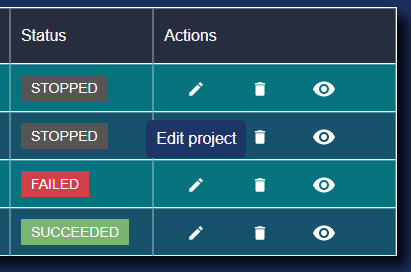
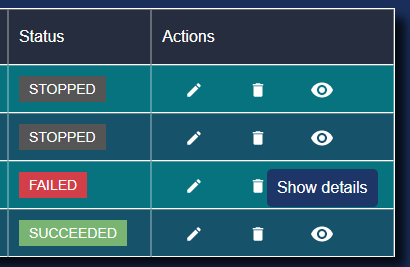
When you will have several projects performed, your Project Monitoring page will show the details and possible actions.
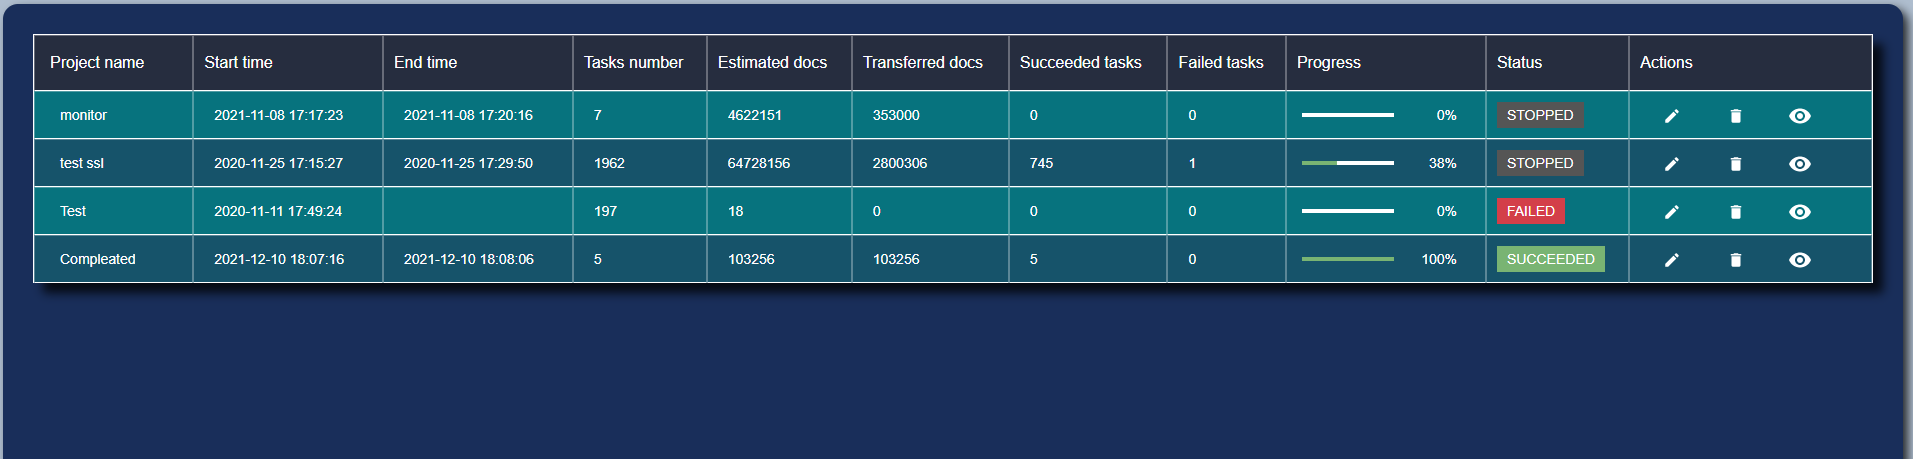
You can edit the project, delete it, or get redirected to Project Monitoring page.
3.1Project Settings/New Project
In this section you will find detailed instructions for performing a reindex project. In order to start a new project, you need to choose “New Project” from main drop-down menu. This will redirect you to “Project settings” page.
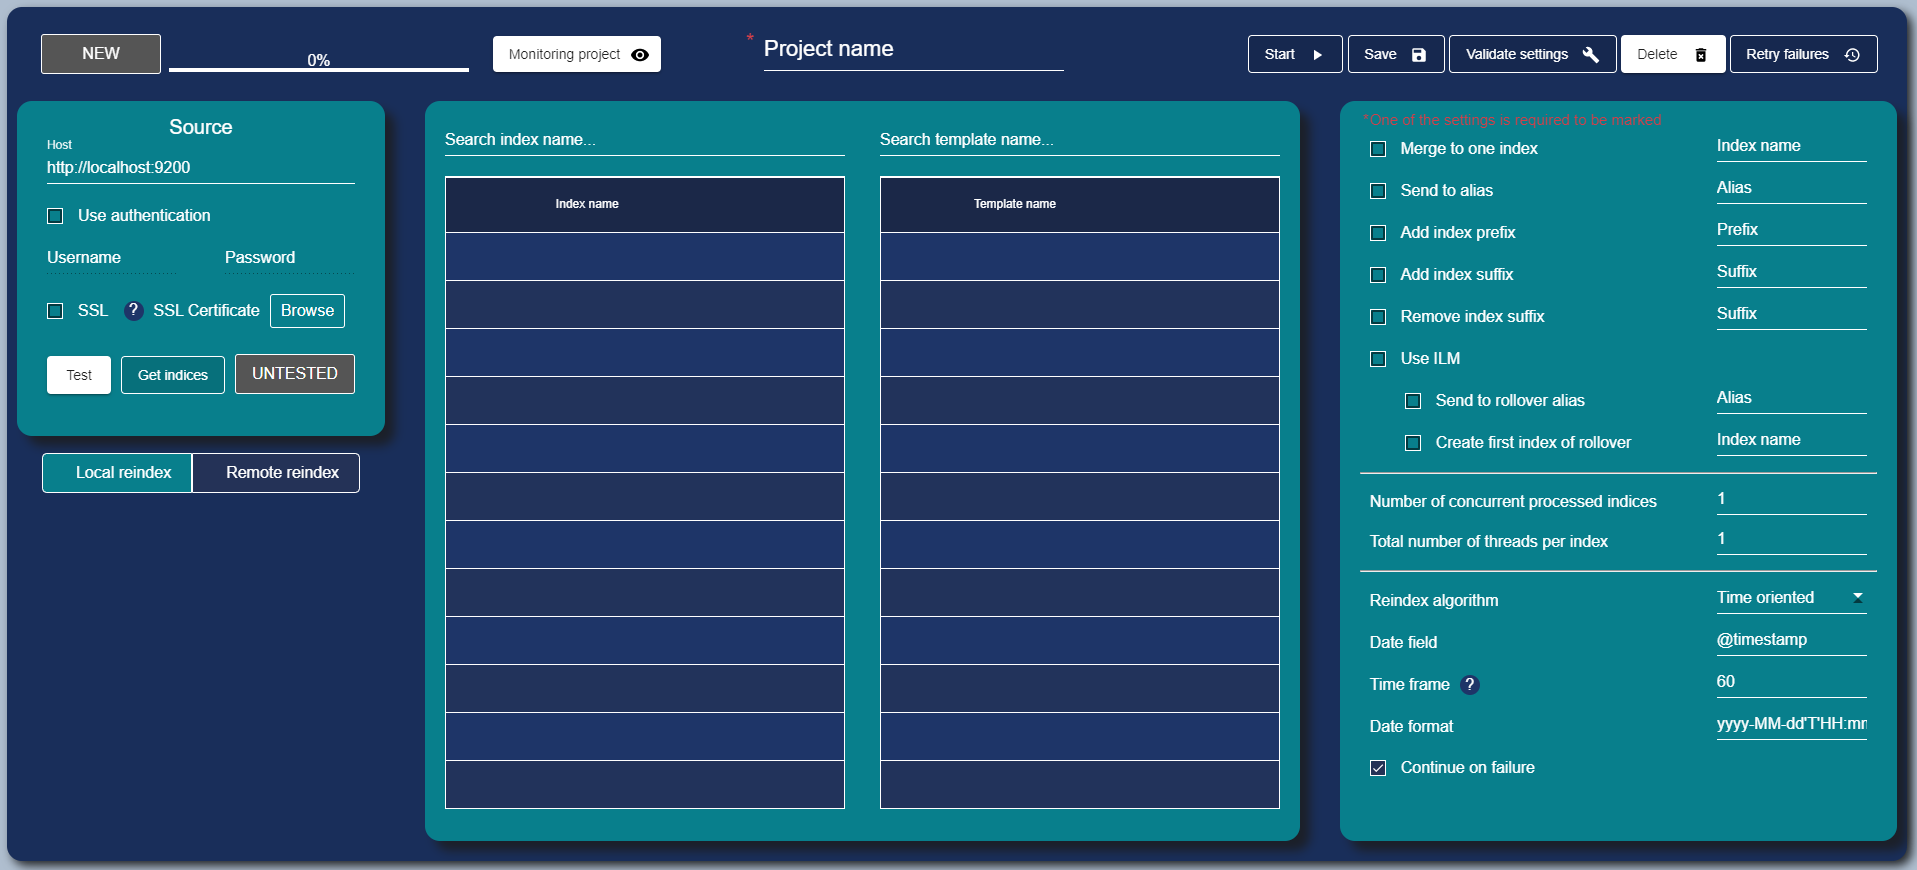
Fields marked * are mandatory. The rest of parameters are chosen according to your needs and project configuration requirements.
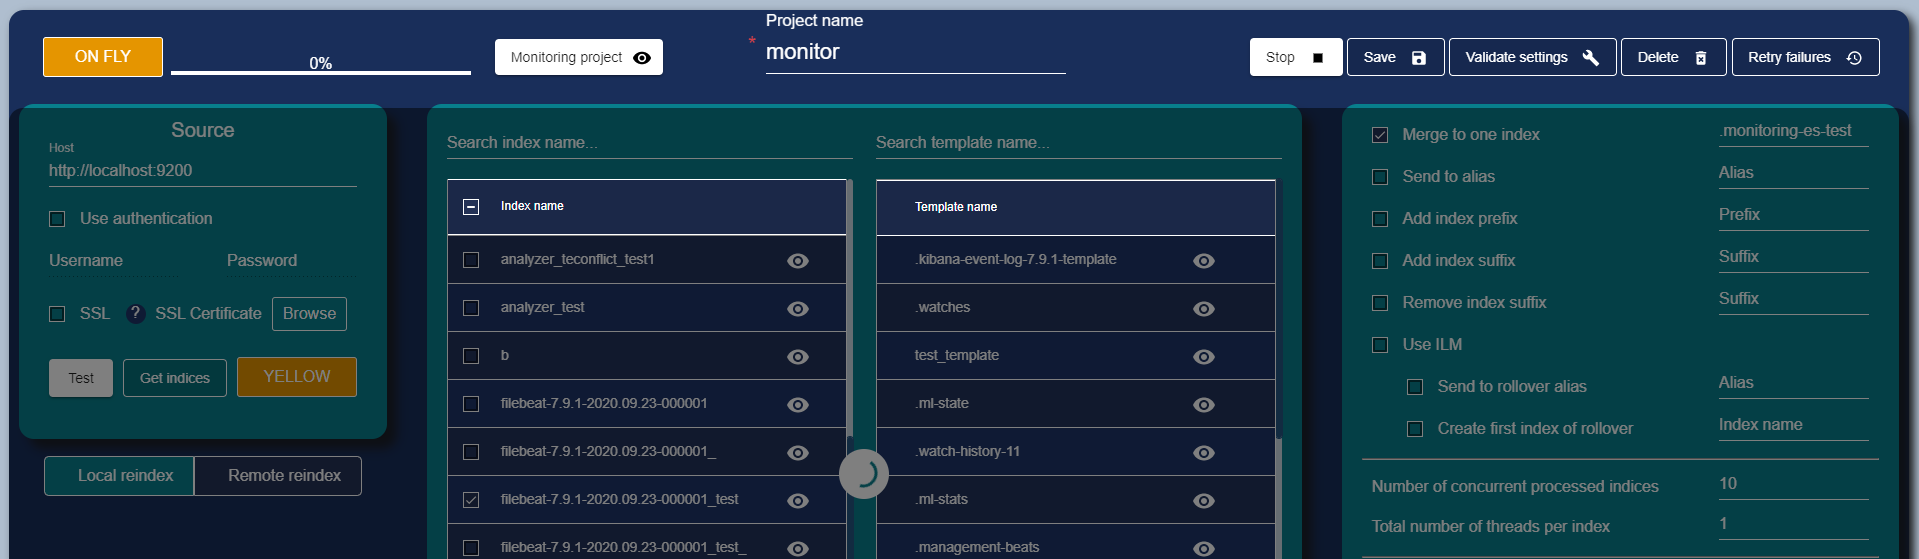
3.1.1Source
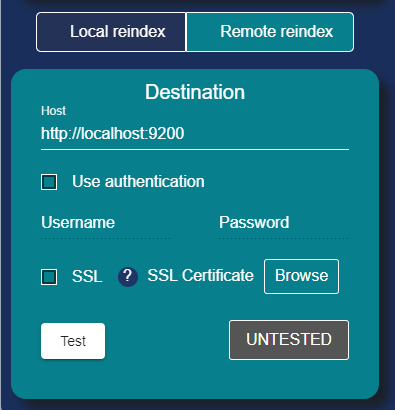
First step is to indicate Host and set basic parameters. The Applications gives opportunity for user authentication and/or to include SSL certificate, if required.
- a.Host may be in format: http(https):// __HOST_OR_IP__:PORT
- b.If you have a need for user authentication, you may choose the checkbox “Use authentication” and define the username and password. NOTE: The Application doesn’t save your passwords in the configuration files, so after application restart, you’ll require to provide the password again.
- c.If your cluster supports the secure connection (https), you have to choose the “SSL” checkbox.
If you provide the SSL certificate, it will be used for secure connection to your cluster. Otherwise, the Application will set up connection to ignore SSL verification.
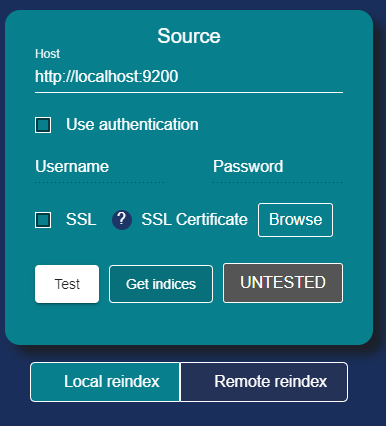
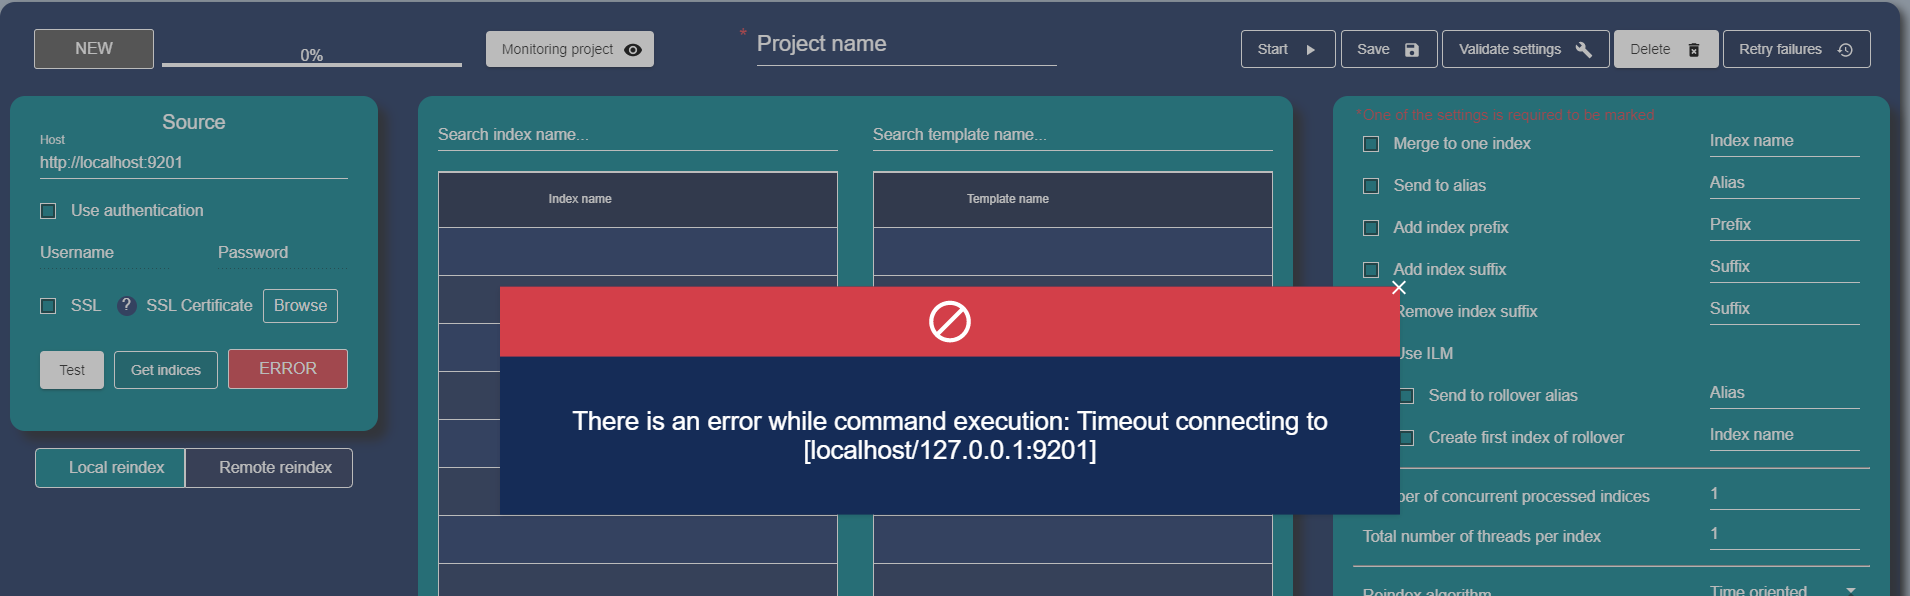
- d.In order to test connection with your Elasticsearch cluster press “Test” button. When testing process will finish you receive the cluster status
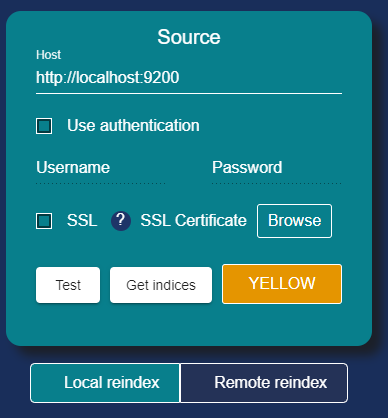
The status button can appear in 3 colors depending on test result: Red/Yellow/Green. Those are standard Elasticsearch cluster statuses.
If there is an Error, in most cases you will receive a “Red” result and a notification with description of the problem.
- e.The lower part allows you to choose the required mode. Local reindex where you do a reindex from a cluster to the same cluster, or remote reindex where you do reindex from one cluster to another. In the case of remote reindex you also need to specify host, authentication credentials (if required) and SSL certificate (if required). For more details and example of remote reidex check Case 3 in “Part 4. Use Cases”.
Here you also need to test connection to your Elasticsearch cluster and will get the same test result as described previously.
3.1.2Indexes and Templates
If the connection test was successful, you need to press “get indices” button in order to receive a list of indices to work with (marking, tracking, checking, etc).
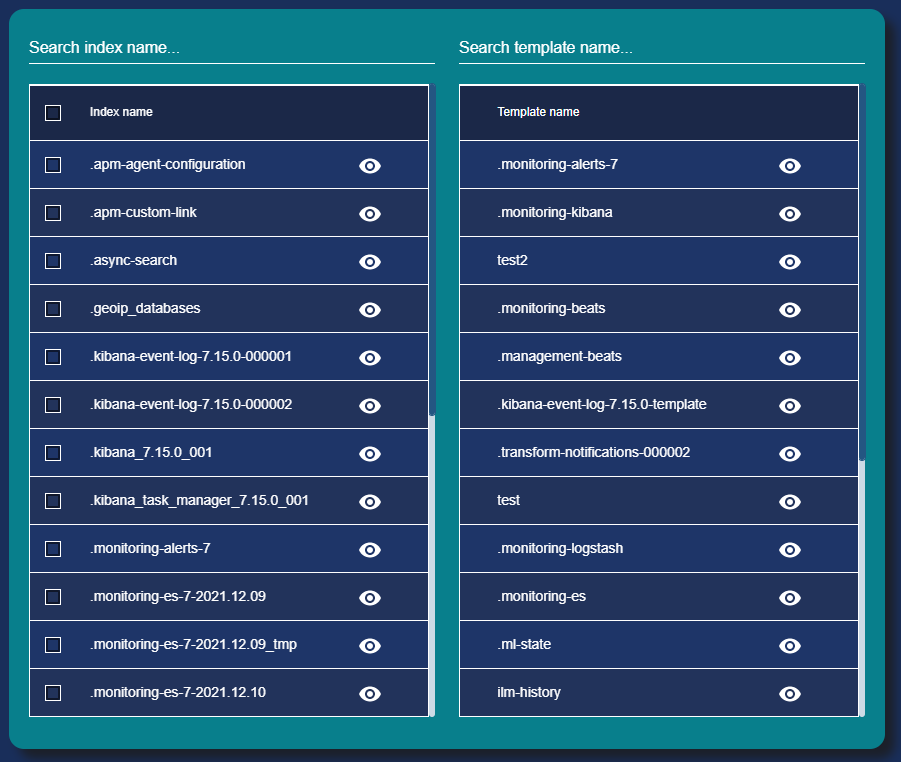
You can choose indices to reindex by selecting checkbox next to correct one, or use “Search index name” field.
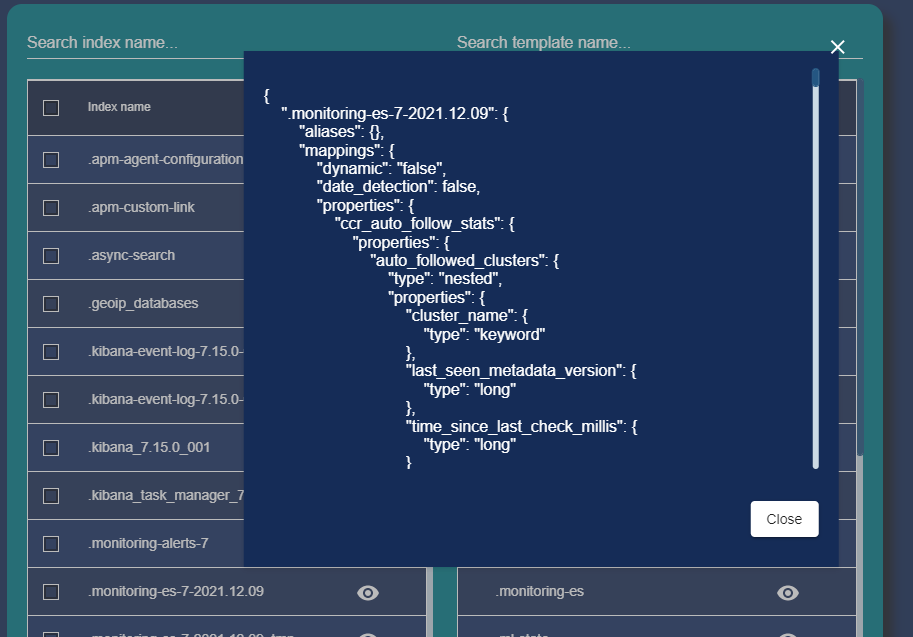
The “Eye” symbol next to index name allows you to see its details, settings, mappings, alias:
Second column “Template name” only allows to see template details by clicking on the “Eye” symbol next to the relevant template name.
3.1.3Destination Settings
You are required to indicate one or several parameters you need, chose number of indexes and threads to run simultaneously and to choose one of two available algorithms.
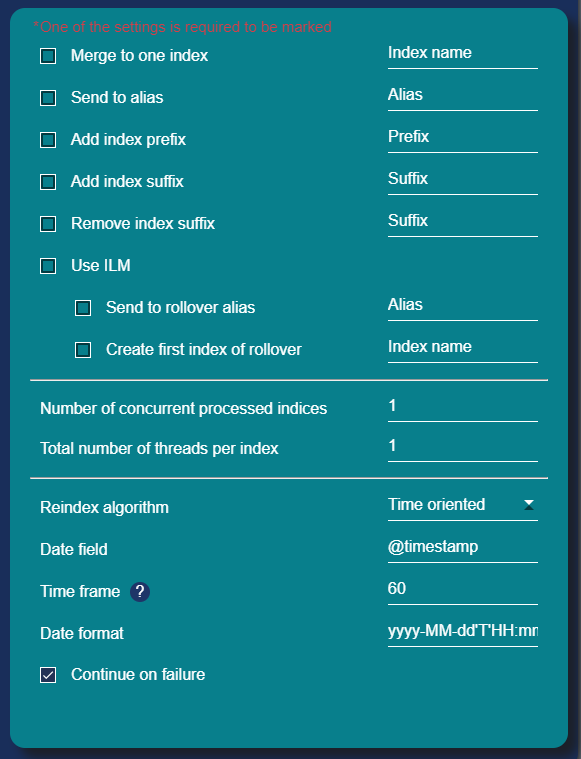
There is a need to select at least one of the checkboxes in the list.
By selecting the checkbox next to required setting you can merge all indices from the list you have generated (“Merge to one index”) or send it to alias (“Send to alias”).
You can also add prefixes, add/remove suffixes or add both suffix and prefix by marking the relevant checkbox.
If you need to use ILM, you can send it to rollover alias and/or create first index of rollover. Please note that in ILM first index has specific formats.
For remote reindex you will have additional option in this settings table:
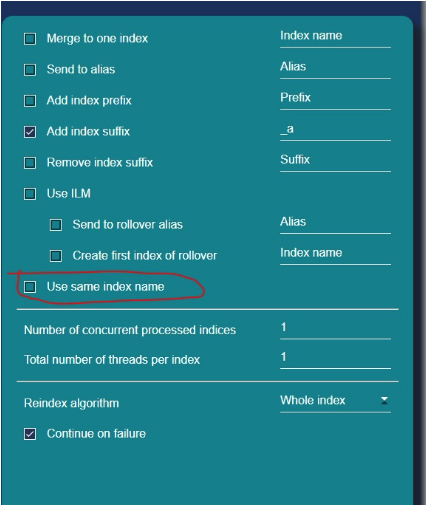
Number of indices and threads
It is very important to consider how many indices and threads will be processed simultaneously.

Especially number of threads is important while using a “Time oriented” algorithm. When using “Whole index” you are using 1 thread only.
Generally, there are no restrictions on the number of processed indices and threads. However, there is a need to keep in mind that big numbers use a lot of CPU and memory, and it may slow down your cluster performance.
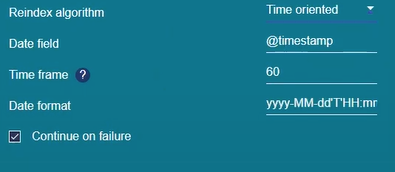
Reindex algorithms
Currently the Application supports 2 reindex algorithms:
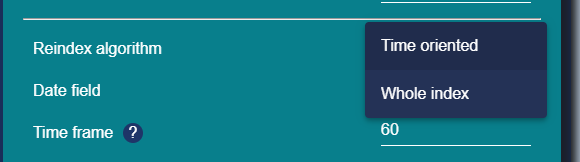
- 1.“Whole index” algorithm, get index as is, and send to the Elastiscearch reindex with “match_all” query.
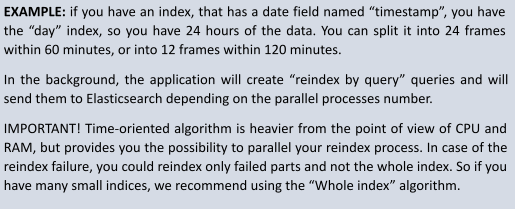
- 2.“Time oriented” algorithm splits your index to the frames, based on the “Date field”. Each frame will be created, depending on the “Time frame” in minutes. You may provide the date field date format.
Continue failure
Marking “Continue on failure” checkbox at the bottom of the page will allow the process to continue even if one of the threads went down. The Application will proceed to next thread.
If the checkbox will remain unmarked, upon the first thread to go down the whole project will stop.
3.2Project Admission

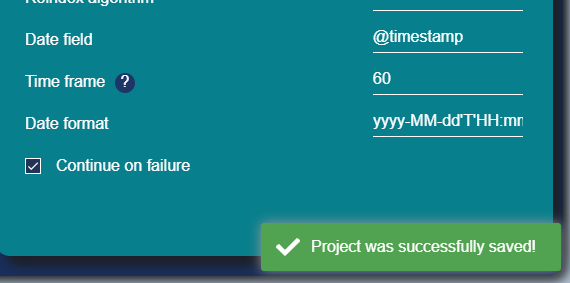
When all settings are indicated, before pressing “Start” button there is a need to press “Save”. You will receive an approval in the lower right corner of the page:
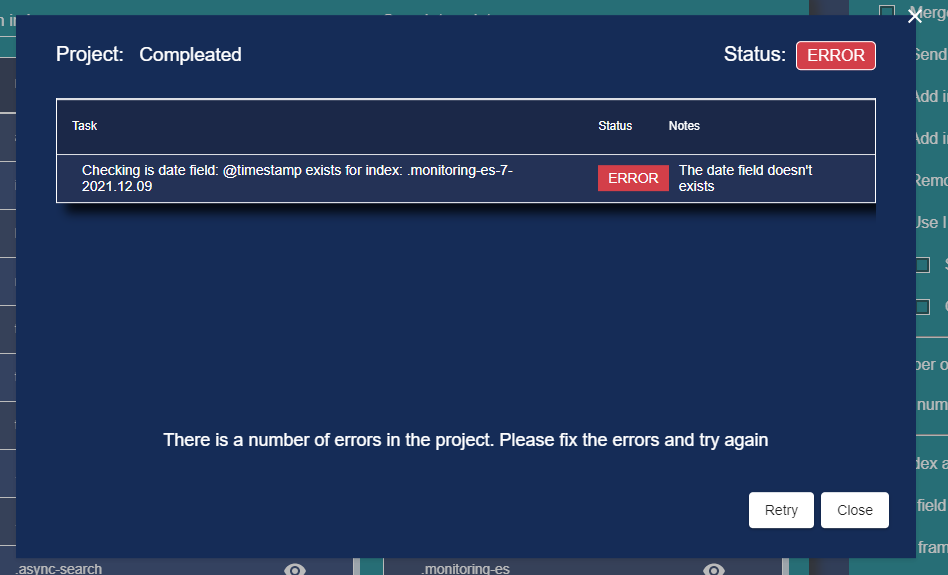
As the next step, you press “Validate settings” in order to make sure that everything is set up correctly. If there are errors your will receive a popup message with ERROR status, for example:
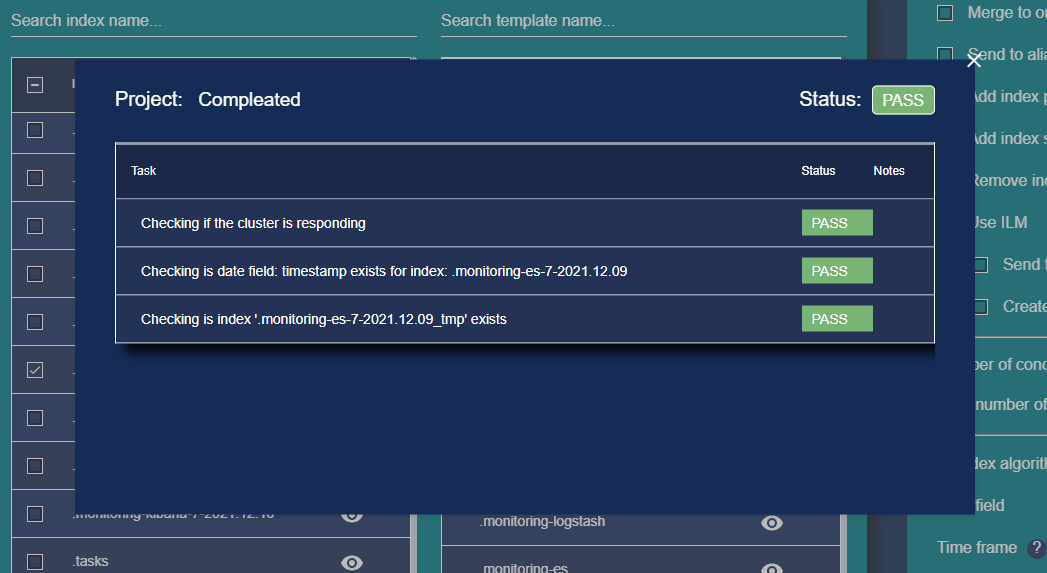
If everything is set up correctly, you will receive a popup message with green PASS status:
If there are potential errors, you will get a WARNING message with description of possible problems:

When everything is ready, you can press “Start” button and you will see in the top left corner indication of started process (“ON FLY”)

Pressing “Monitoring project” button will redirect you to Project Monitoring page.
3.3Projects Monitoring
“Project Monitoring” page is where you can see status and details of your project. Here you can see total amounts of tasks, waiting and succeeded tasks, number of failures and amounts of docs to be transferred.
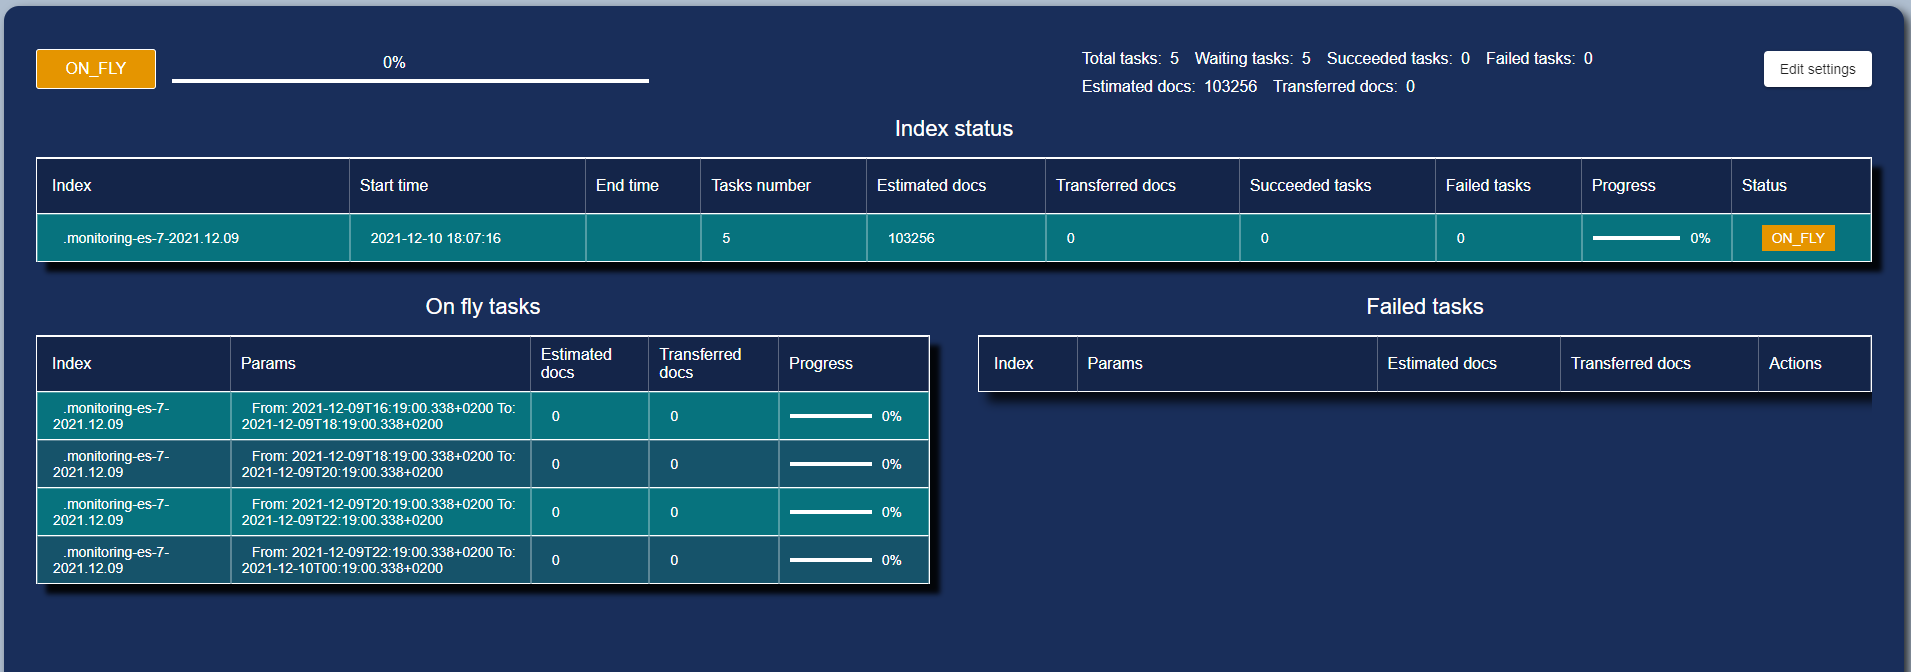
- 1.In the main table you see you running indices (“Index status”).
- 2.In the bottom left (“On fly tasks”) you can see running threads
- 3.In the bottom right (“Failed tasks”) you see details of any failed threads.
By pressing “Edit settings” button in the top right corner you can get back to Project Settings page. Top of this page will be slightly different from the time when you did initial settings.
While the project is running, you have “Stop” button.
NOTE: if you press “Stop” this will stop the project completely and you will have to start it again. You will need to only “validate settings” again, there is no need fill the settings details one more time.
Currently there is no “Pause/Continue” option.
Progress bar at the top left corner is indicating the tasks progress, not the number of reindexed documents.
3.4Open Saved Project
Buy picking this category in the main menu, you will go directly to the Project Monitoring page of a specific project chosen.
4.Standard Use Cases
Case 1Merging indices.
Task
Merge 30 small day indices in format my_day-2021.01.
into one month index. You have a month of small day indices, for example: 100mb per index. You don't need so many small indices, you want 1 month index.
Steps:
- 1.Set project name
- 2.Setup source
- 3.Test connection with your cluster
- 4.Press “Get indices”
- 5.In the search field of “Index list” insert: my_day-2021.01.
- 6.Choose indices to work with
- 7.Choose “Merge to one index” checkbox and write the index name: my_day-2021.01
- 8.Choose 5 concurrent indices
- 9.Choose "whole index" algorithm
- 10.Press “Save”
- 11.Press “Validate” and wait for “Approval” message
- 12.Press “Start”
To see and check the process and its status go to "Monitoring project".
Case 2Big index to new one for right shard number.
Task
You have massive index (400GB primary data), that mistakenly have only one shard. You need to reindex it to the new one that have 10 shards. In the Elasticsearch you defined the template with number_of_shards: 10, or defined new index with similar definition. But now you need to reindex.
If you'll do this with the regular reindex command, this will get many “time”. In the application you can use Time oriented algorithm.
Steps:
- 1.Set project name
- 2.Setup source
- 3.Test connection with your cluster
- 4.Press “Get indices”
- 5.Choose indices to work with
- 6.Choose “Merge to one index” checkbox and write the index name: MY_INDEX
- 7.Choose 5 concurrent threads per index (you can set more, it depends of your cluster)
- 8.Choose "Time oriented" algorithm
- 9.Indicate “Date field”
- 10.Choose time format
- 11.Set “30” in the data frame (split the index to 48 parts)
- 12.Press “Save”
- 13.Press “Validate” and wait for “Approval” message
- 14.Press “Start”
To see and check the process and its status go to "Monitoring project".
Case 3Remote reindex.
Task:
You have 2 clusters: Prod and Dev (Both of them with SSL). And you want to copy 10 small indices from Prod to Dev.
Steps:
In the For remote reindex to cluster with https connection: In your elasticsearch.yml file in each Elasticsearch node of the remote cluster you'll require to define: reindex.remote.whitelist: "otherhost:9200, another:9200, 127.0.10.:9200, localhost:" (PAY ATTENTION! There is no http/https at start of the address) reindex.ssl.verification_mode: none (One of full, none, certificate) reindex.ssl.certificate: /etc/elasticsearch/certs/ca.crt (Path to root ca) This is only example... you can use another SSL settings. In your elasticsearch.yml file in each Elasticsearch node of the dev cluster you'll require to define: reindex.remote.whitelist: "prodhosts-01*:9200" (PAY ATTENTION! There is no http/https at start of the address) reindex.ssl.verification_mode: none (One of full, none, certificate) reindex.ssl.certificate: /etc/elasticsearch/certs/ca.crt (Path to root ca or another certificate)
- 1.Set project name
- 2.Setup source
- 3.Test connection with your cluster
- 4.Press “Get indices”
- 5.Choose “Remote reindex”
- 6.Test connection with your cluster
- 7.Choose indices to work with
- 8.Choose “Use same index names”
- 9.Choose 5 concurrent threads per index (you can set more, it depends of your cluster)
- 10.Choose "whole index" algorithm
- 11.Press “Save”
- 12.Press “Validate” and wait for “Approval” message
- 13.Press “Start”
To see and check the process and its status go to "Monitoring project".